12
11 Jun 2024

Dokku’s /var/lib/docker/overlay2 too big?

One of the frustrating things about Dokku, is that pushes often report as succesful when they haven’t been. The most obvious example is when it didn’t trigger a build (see last post for more on that). But another one is if you’re out of disk space, and dokku fills up the /var/lib/overlay2 directory with a lot of images. Dokku’s own prune command is very conservative and doesn’t make much of an impact at all. And deleting anything from this directory is an absolute no no.

Freeing up space more effectively can be done with

docker system prune -a

This freed me up 21G of space. But it is going to fill up again pretty soon, so this is best set up as a cron job with the -f flag to stop it requesting for confirmation

Hit crontab -e and add the following

56 10 * * * docker system prune -af

And this should keep your /var/lib/docker/overlay2 folder in check

11
20 Mar 2024

Viewing and finding images more easily in filesystem

If you have lots of images scattered across different locations in your filesystem, the spotlight search isn’t necessarily the most user friendly way of finding the one you’re looking for if you don’t know the name of the file.

The small script below finds all images relative to the point the function is run, creates a html page and populates it with each image it finds. It then spins up a webserver and opens the newly created page. Once the command is terminated the temporary html page is removed.

pics () {
	local template="$HOME/.zsh/templates/html"
  IFS=$'\n'
	local list=(**/*.[jp]*g)
  local page="000.html"
	trap '_delete_temp_page $page' INT
	sed '$d' $template | sed '$d' > $page
	for i in "${list[@]}"
	do
		echo "<img src=\"./$i\">" >> $page
	done
	tail -n 2 $template >> $page
	_webserver $page
}

Firstly we create a blank html page in the templates directory, shown later in this post. Secondly we set the Internal Field Separator to a newline character instead of the default space. We need to do this because it allows for filenames that contain blank spaces, something commonplace on a Mac.

Next we create a list of all images files relative to the current location, and create a page variable of 000.html, though this could be renamed to something more abstract as it will be destroyed. Or a check could be added in here to return if a file with that name already exists, but I’ve not included that here.

Next we set a trap to listen for the INT signal, generally CTRL-C or whatever escape character is pressed, this will then run the _delete_temp_page function detailed below, passing it the newly created 000.html page.

The sed command removes the last two lines from the template file (the closing body and html tags), and then we iterate through the list of found images creating an image tag in the html for each entry. Finally we use tail to add the last two lines from the template file back in. We then spin up a webserver with the _webserver function

_delete_temp_page

_delete_temp_page () {
	echo "Stopping web server..."
	echo "Removing $1"
	[ -f $1 ] && rm $1
	trap - INT
}

Here we remove the file that is passed to the function, in this case 000.html, and disable the trap. Otherwise ctrl-c will continue to invoke the function whenever pressed

_webserver

_webserver () {
	browser-sync start --server --startPath "$page" --port 6375 --browser "safari"
}

Simple one liner to open the page in Safari

the template html

Here we create a template html page and story it in the templates dir inside zsh

 cat ~/.zsh/templates/html
<html>
<head>

<style>
 body {
    margin: 0 auto;
    text-align: center;
    padding: 16px;
  }

  img {
    padding: 8px;
    max-width: calc(100vw - 32px);
  }
</style>
</head>
<body>
</body>
</html>

Nothing exciting here, as we saw above the script copies this file, uses sed to remove the last two lines before adding the image entries, and then using tail to add the last two lines in. Due to its generic nature we can reuse this html file in other contexts too.

10
11 Jan 2024

Setting up a default Makefile with wildcard rule

When setting up a new project, I like to have a default Makefile that I can use to run common tasks. This is a simple Makefile that I use to run common tasks. A project might have different ways of launching parts of the application, and standardising and centralising these commands is a good way of keeping things simple and consistent. It is also self-documenting, as the tldr target lists all the available targets by default. Lets take a look at my default Makefile, and then explore easily targets via a shell function.

tldr:
        @echo Available commands
        @echo ------------------
        @grep '^[[:alpha:]][^:[:space:]]*:' Makefile | cut -d ':' -f 1 | sort -u | sed 's/^/make /'
%:
        @$(MAKE) tldr

As we can see, there are only two commands defined. The first is tldr, which lists all the available commands. The second is %, which is a wildcard that matches any command that is not defined. This is used to print the tldr command if an invalid command is entered.

The tldr rule prints out all the commands in the Makefile. It does this by using grep to find all the lines that start with a letter, followed by a colon. It then uses cut to extract the first field, which is the command name. It then uses sort to sort the commands, and finally uses sed to add the make command to the start of each line. The output looks like this:

  brew@kelso:projects/making  ➜ make tldr
Available commands
------------------
make tldr

As there is only one rule defined, the wildcard rule is used to print the tldr command. Same thing happens if you enter an invalid command, instead of erroring out, it prints the tldr command.

  brew@kelso:projects/making  ➜ make nonsense
Available commands
------------------
make tldr

Using the addmake function to create or add to the Makefile

addmake () {
  if [[ ! -f Makefile ]];
    then
    cp ~/.zsh/templates/Makefile .
  fi
  if [[ ! $1 ]];
    then
    make tldr
    return
  fi
  local target=$1 || read "target?Enter target: "
  if [[ -e $target ]]
    then
    echo "Error: A file or directory named '$target' already exists." && return 1
  fi
  if grep -q "^$target:" Makefile
    then
    echo "Error: Target '$target' already exists in the Makefile." && return 1
  fi
  [[ -n $2 ]] && local recipe=$2 || read "recipe?Enter recipe: "
  echo "$target:\n\t$recipe" >> Makefile
  echo "\nSuccess: Target '$target' added to Makefile\n"
  make tldr
}

Lets run through the function. First, we check if a Makefile exists in the current directory. If it doesn’t, we copy the default Makefile shown above, which is stored in ~/.zsh/templates/Makefile.

Next, we check if the first argument is empty. If it is, we run make to print the tldr command, listing available commands, and then exit.

If we run the addmake function with one argument, it will create a new target with the argument and then prompt us for the corresponding recipe. If we run it with two arguments, it will create a new target with the first argument and the recipe with the second argument, before running the tldr target to list all the available commands, including the newly added target.

It also checks to make sure the target doesn’t have the same name as a file or directory at the top level of the project, which make doesn’t seem to like. It also checks to make sure the target doesn’t already exist in the Makefile.

Lets take a look at the function in action.

  brew@kelso:projects/making  addmake
Available commands
------------------
make tldr
  brew@kelso:projects/making  ➜ addmake hello "@echo hello world"

Success: Target 'hello' added to Makefile

Available commands
------------------
make hello
make tldr
  brew@kelso:projects/making  ➜ addmake goodbye
Enter recipe: "@echo see you in the next episode"

Success: Target 'goodbye' added to Makefile

Available commands
------------------
make goodbye
make hello
make tldr
  brew@kels:projects/making ➜ addmake hello
Error: Target 'hello' already exists in the Makefile.
  brew@kels:projects/making ➜ addmake images
Error: A file or directory named 'images' already exists.
9
21 Aug 2023

Improving display of unmerged commits

The purpose of the unmerged function is to show only unmerged commits from all branches. Lets take a look at the output, and then delve into the code.

Output

unmerged output

When the function is run from inside a repo it will return

  • the number of unmerged commits
  • how long ago the last commit was
  • the commit message of the last commit
  • the name of its branch
unmerged output

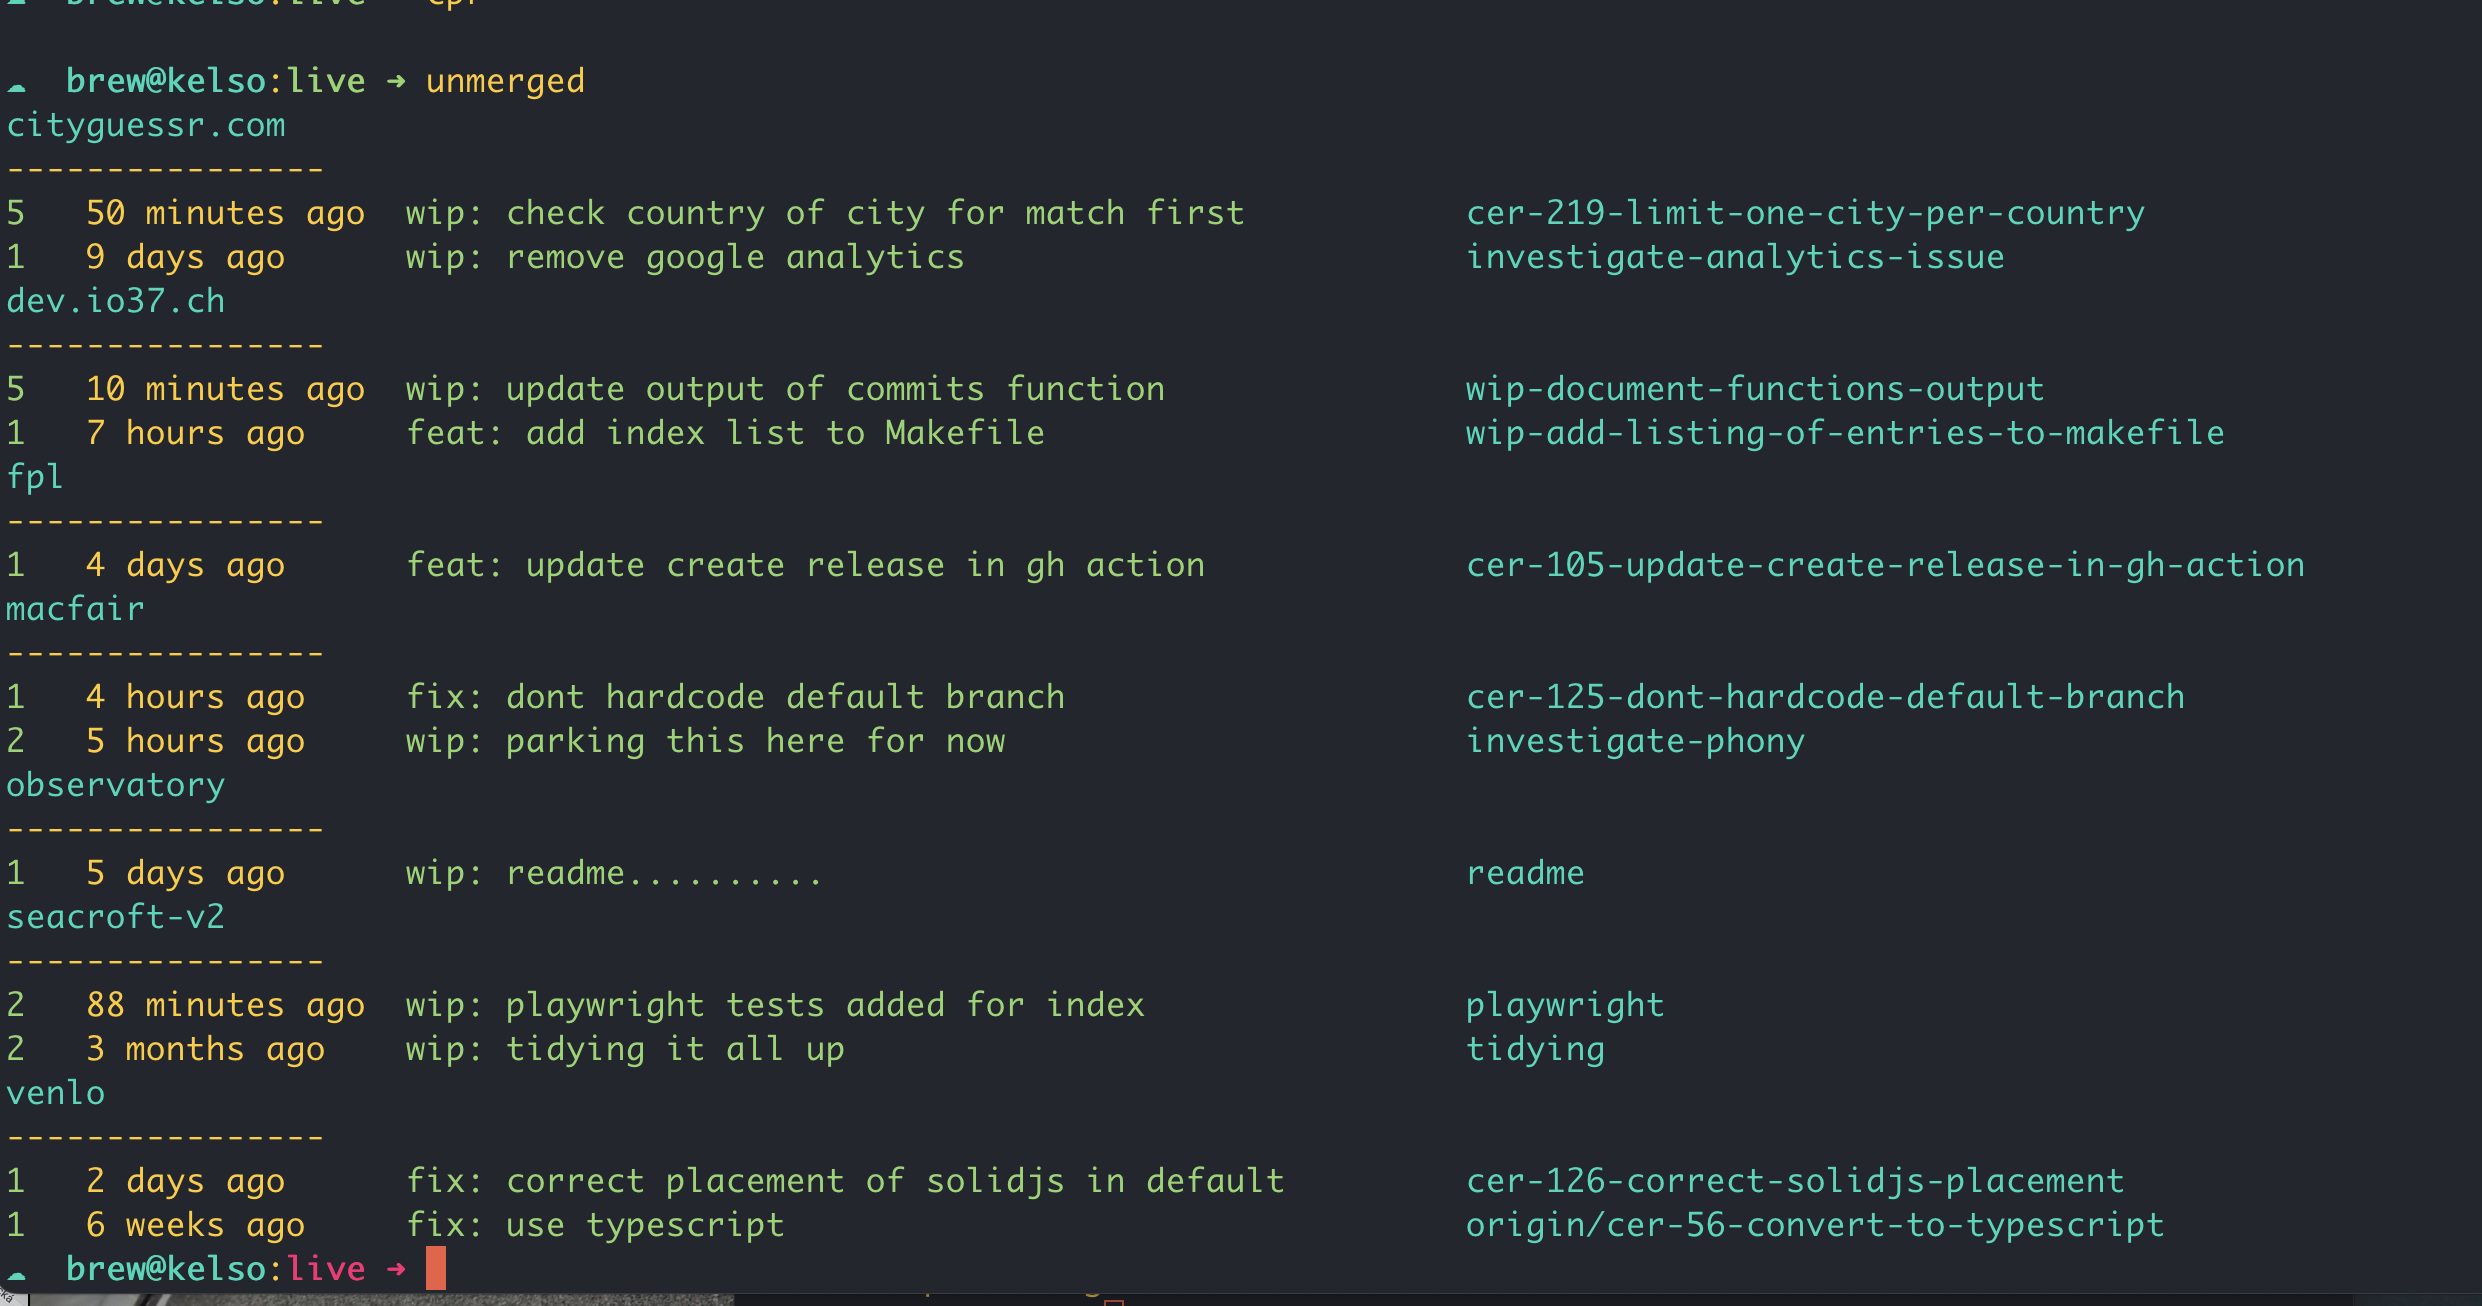
When the function is run from outside a repo it will check for repos in the current directory, and return the name of the repo and the same information as in the previous instance, but limited to the last two unmerged commits per repo.

Code

Lets take a look at the code. We’ll look at the main unmerged function initially, and then the two helper functions it uses.

unmerged

unmerged () { # List unmerged commits # ➜ unmerged 5
  if [ ! -d .git ]; then
    _unmerged_commits_across_repos
    return
  fi
  local default=$(_default_branch)
  [[ $1 ]] && no=$1 || no=500 # List most recent unmerged commit in each branch
  for branch in $(git branch --sort=-authordate | tr -d "* " | grep -v "^$default$"); do
    if [ -n "$(git log $default..$branch)" ]; then
      no=$(git rev-list --count $default..$branch)
      date=$(git log -1 $branch --pretty=format:"%ar" --no-walk)
      message=$(git log -1 $branch --pretty=format:"%s" --no-walk)
      printf "$no $date $message $branch\n"
    fi
  done | head -$no | awk '{first = $1; date = $2 " " $3 " " $4; last = $NF; message = substr($0, length($1 $2 $3 $4) + 5, length($0) - length($1 $2 $3 $4 $NF) - 5); printf "\033[0;32m%-3s \033[1;0m%-15s \033[0;32m%-52s \033[0;36m%s\n", first, date, message, last}'
}

Lets break down the above function step by step.

if [ ! -d .git ]
then
    _unmerged_commits_across_repos
    return
fi

If the current directory is not a git repository (i.e., it doesn’t have a .git directory), it calls the helper function _unmerged_commits_across_repos and then exits.

local default=$(_default_branch)

This calls the helper function _default_branch to determine the default branch of the repository.

[[ -n $1 ]] && no=$1 || no=500

If the function is called with an argument (e.g., unmerged 10), it will use that number to limit the number of branches displayed. If not, it defaults to showing 500 branches, effectively showing all unmerged branches

for branch in $(git branch --sort=-authordate | tr -d "* " | grep -v "^$default$")
  if [ -n "$(git log $default..$branch)" ]

This loop goes through each branch in the repository, sorted by the author date in descending order. It excludes the default branch, and checks if there are any commits in the branch that are not in the default branch.

if [ -n "$(git log $default..$branch)" ]

This checks if there are any commits in the branch that are not in the default branch.

no=$(git rev-list --count $default..$branch)
date=$(git log -1 $branch --pretty=format:"%ar" --no-walk)
message=$(git log -1 $branch --pretty=format:"%s" --no-walk)
printf "$no $date $message $branch\n"

This prints the number of unmerged commits, the date of the last commit, its message, and the branch name. The awk command at the end of the function is used to format the output and add some color to it. The output will show the number of unmerged commits in green, the date in default color, the commit message in green, and the branch name in cyan.

_unmerged_commits_across_repos

_unmerged_commits_across_repos () {
  for i in */; do
    if [ -d "$i".git ]; then
      (
        cd "$i"
        local output=$(unmerged 2)
        if [[ -n "$output" ]]; then
          local repo_name=$(basename $(git rev-parse --show-toplevel))
          echo '\e[36m'$repo_name
          echo "----------------"
          echo $output
        fi
      )
    fi
  done
}

Lets break down the above function step by step.

for i in */
  if [ -d "$i".git ]

This loop iterates over all directories in the current directory.

(
  cd "$i"
  local output=$(unmerged 2)
)

The code inside the parentheses runs in a subshell, which means it won’t affect the current shell’s environment. The script changes to the directory $i and then calls the unmerged to check for the 2 most recent unmerged commits.

if [[ -n "$output" ]]; then
  local repo_name=$(basename $(git rev-parse --show-toplevel))
  echo '\e[36m'$repo_name
  echo "----------------"
  echo $output
fi

If the unmerged function returns any output (indicating there are unmerged commits), the script gets the name of the repository using git rev-parse --show-toplevel and then prints the repository name in cyan, followed by a separator, and the output from the unmerged function.

_default_branch

_default_branch () {
  if [ ! -f .git/refs/remotes/origin/HEAD ]; then
  	local branch="main"
  else
    local branch=$(git symbolic-ref refs/remotes/origin/HEAD | sed 's@^refs/remotes/origin/@@')
  fi
   echo $branch
}

This function determines the default branch of the repository. It checks if the file .git/refs/remotes/origin/HEAD exists. If it does, it uses the contents of that file to determine the default branch. If not, it defaults to main.

8
2 Jun 2023

Why you should use a Makefile

If you have a project or application where you need to run a lot of commands, npm, rake, bin, rails, etc, then you should consider using a Makefile as a front end utility. This has a few advantages:

  • You can run multiple commands at once
  • All commands are launched with the same command, make
  • All commands are self-documenting

Lets look at an example of a sample Makefile

tldr:
        @echo Available commands
        @echo ------------------
        @grep '^[[:alpha:]][^:[:space:]]*:' Makefile | cut -d ':' -f 1 | sort -u | sed 's/^/make /'
install:
        bundle install
        yarn install --check-files
exchange_rates:
        ./bin/rake exchange_rates:refresh
subscription_plans:
        bundle exec rails runner 'SubscriptionPlan.import_all_plans'
generate:
        ./bin/init.js
storybook:
        yarn storybook
start:
        npm run start

Here we have a variety of commands that are all launched in different ways. With a Makefile, we can run them each of them with an easier to remember make \<command\>. We can also see all the commands available with make tldr or just make. Any new commands added to the Makefile are automatically caught by the make tldr command.

In action

  cericow@kelso:esplanade  make
Available commands
------------------
make tldr
make install
make exchange_rates
make subscription_plans
make generate
make storybook

Running the make command picks up the first rule (tldr) and runs it. The rule greps the file for available rules and lists them out in the format in which they should be run.

7
1 Jun 2023

Policing commit messages to conform to a semver-like standard

I’ve been using a git hook to police commit messages for a while now to ensure that they conform to a semver-like standard. As someone thats prone to writing commit messages like “fixing stuff” or “more stuff” this has been a great way to enforce better commit messages. Lets look at the hook below.

# ~/.config/git/hooks/commit-msg

#!/usr/bin/env zsh
declare -r msg=$(< $1);
title=${msg%%$'\n'*}
[[ ${#title} -lt 20 ]] && echo 'Please enter a more informative commit message' && exit 1
[[ ${#title} -gt 50 ]] && echo 'Please keep commit summary below 51 characters' && exit 1
[[ $msg == wip:[[:space:]]* ]] && exit 0
[[ $msg == fix:[[:space:]]* ]] && exit 0
[[ $msg == feat:[[:space:]]* ]] && exit 0
[[ $msg == feat!:[[:space:]]* ]] && exit 0
[[ $msg == docs:[[:space:]]* ]] && exit 0
echo "your commit should begin with fix:, feat:, feat!:, docs:, or wip:"
echo "dont forget the colon, and the space after it"
echo "commits prefixed with wip must be squashed before submitting PR"
exit 1

This hook is written in zsh, but it should be easy to convert to bash if thats your preference. The hook is placed in ~/.config/git/hooks/commit-msg and is made executable with chmod +x ~/.config/git/hooks/commit-msg. The hook is run after you write your commit message and save it. If the hook exits with a non-zero exit code, the commit is aborted. The hook checks that the commit message is between 20 and 50 characters, and that it begins with one of the following prefixes: wip:, fix:, feat:, feat!:, or docs:. This only affects the title or first line of the PR, the body can be any length.

fix: (0.0.1), feat: (0.1.0), and feat!: (1.0.0) conform to semver standards, and can be used with a github action like conventional-changelog-action to auto-update package.json, changelog.md, and create releases on github.

docs: signifes a change to documentation, and does not affect the version number.

wip: is a special prefix that allows you to commit work in progress. These commits should be squashed before submitting a PR.

Now if we try commiting with a message that doesn’t conform to the above standards we get the following error.

  cerico@kelso:data-for-france  (kos-13-adding-data-for-strasbourg) git commit -m "im just fixing stuff"
your commit should begin with fix:, feat:, feat!:, docs:, or wip:
dont forget the colon, and the space after it
commits prefixed with wip must be squashed before submitting PR

The above hook prevents commits which don’t conform to the semver standard, but sometimes we might want to be able to add temporary “fixing stuff” type commits that aren’t intended to make it into the main branch. The hook allows me us do so as long as the messages is prefixed with wip:. When its time to submit a PR we can see clearly any commits that should be squashed or otherwise tidied up before submitting the PR. In a later post I’ll show another function ghpr, which will catch any wip commits before creating the PR, as well as filling in the title and body of the PR.

6
31 May 2023

Blocking commits on main with the pre-commit hook

While you can edit the settings on github to block commits on main, it’s also possible to do it locally so you can prevent it from happening in the first place by using the pre-commit hook.

# ~/.config/git/hooks/pre-commit
branch="$(git branch --show-current)"
commits="$(git rev-list --all)"

if [ "$branch" = "main" ] && [ "$commits" != "" ]; then
  echo "Commit on main branch is blocked, there are already existing commits."
  exit 1
fi

Any newly created repo will automatically have this hook in place. If you want to add it to an existing repo, you can copy the file to the .git/hooks directory. Typically in a newly created repo we will want the initial commit to be on main, so the hook also checks there are any existing commits before blocking the commit.

  brew@kelso:asda  (main) ✗ git add README.md
  brew@kelso:asda  (main) ✗ git commit -m "adding initial documentation"
main branch commit is blocked
5
30 May 2023

Using brew in a multi-user system

On a mac brew can get into a bit of a muddle on a multi-user system if you are not careful. The problem is that brew installs everything in /usr/local and if you have multiple users then the permissions can get a bit messed up. The answer to this is to install brew as normal for the first user, but any subsequent users shouldn’t install their own version, but run the first users installation instead.

To do this, set up an alias in your ~/.zshrc to run brew as that user.

# ~.zshrc
unalias brew 2>/dev/null
brewser=$(stat -f "%Su" $(which brew))
alias brew='sudo -Hu '$brewser' brew'

Lets break this down. The first line removes any existing alias for brew. This is because we need to ‘real’ brew in the second line to find the installation location (which brew).

The second line gets the user that brew is installed under. The third line creates an alias for brew that runs brew as the user that brew is installed under. The 2>/dev/null just stops an error message if there is no existing alias (which we would get on the first sourcing of the file as in that instance brew would be the ‘real’ brew).

4
29 May 2023

Finding most recently updated projects with the ‘recent’ function

The purpose of this recent function is to find and print the most recently updated directories containing a specific file or folder, relative to the current directory. Lets say for example we wanted to find the 6 most recently updated directories containing a Makefile, showing the date of the last updated file in each directory (ie not the Makefile itself)

Usage

 recent 6 Makefile
Finding 6 most recent directories containing Makefile
---
2023-05-28 venlo
2023-05-08 observatory
2023-05-08 lighthouse-ii
2023-05-08 docker/getting-started/vaxjo
2023-05-08 contabo
2023-05-07 research/seacroft

19 total

Lets look at the code

recent

recent () { # Find n most recent directories containing named file # ➜ recent 12 astro.config.mjs
  [[ $1 = [1-9]* ]] && num=$1 || num=10
  [[ $1 = [.[:alpha:]]* ]] && f=$1 || f='.git'
  [[ $2 = [1-9]* ]] && num=$2
  [[ $2 = [.[:alpha:]]* ]] && f=$2
  local tmpfile=$(mktemp)
  echo Finding $(ColorCyan $num) most recent directories containing $(ColorGreen $f)
  echo ---
  find . -maxdepth 5  -not -path '*node_modules*' -name $f -print 2>/dev/null | while read -r line; do
    local mod_date=$(_most_recent_in $line)
    local formatted_dir=$(_format_dir_path $line)
    echo "$mod_date $formatted_dir" >> "$tmpfile"
  done
  sort -r "$tmpfile" | head -n $num
  echo ""
  echo "$(ColorCyan $(wc -l < "$tmpfile")) total"
  rm "$tmpfile"
}

Lets break down whats happening here.

  • [[ $1 = [1-9]* ]] && num=$1 || num=10

    If the first argument is a number, then set the variable num to this value. Otherwise, sets num to the default value of 10.

  • [[ $1 = [.[:alpha:]]* ]] && f=$1 || f='.git'

    But if the first argument is a string then set the variable f to this value. Otherwise, sets f to the default value of ‘.git’.

  • [[ $2 = [1-9]* ]] && num=$2

    If the second argument is a number, then set the variable num to this value. Otherwise, num remains its previous value, set on the first line.

  • [[ $2 = [.[:alpha:]]* ]] && f=$2

    And if the second argument is a string then set the variable f to this value. Otherwise, f remains its previous value, set on the second line.

  • local tmpfile=$(mktemp)

    Here a tmp file tmpFile is creatd, to store the results of the search.

  • find . -maxdepth 5 -not -path '_node_modules_' -name $f -print 2>/dev/null | while read -r line; do

    Here we execute a find command, searching for the file or directory specified by the variable f. We’re limiting the search to a maximum depth of 5 directories, and excluding any directories named node_modules. We’re then piping the results of the find command to a while loop.

  • local mod_date=$(_most_recent_in $dir)

    Inside the while loop, we’re calling the function _most_recent_in, passing in the line from the loop. The function _most_recent_in returns the date of the most recently updated file or directory. We’ll cover how this works in the next section.

  • local formatted_dir=$(_format_dir_path $dir)

    Similarly, also inside the while loop, we’re using the _format_dir_path function to format the line from the loop. We’ll also cover this in the next section.

  • echo "$mod_date $formatted_dir" >> "$tmpfile"

    Finally, inside the while loop, we’re printing the date and directory path of each found f to the tmp file tmpFile

  • eort -r "$tmpfile" | head -n $num

    And now back outside the loop, the temp file contains a list of all the found f files and/or directories, which are then sorted in reverse order, and limited to a count of num` specified at the start of the function

_most_recent_in

_most_recent_in () {
	[[ ! -n $1 ]] && return
	[[ -f $1 ]] && term=$(dirname "$1") || term=$1/..
	if [ $(uname) = 'Darwin' ]
	then
		find $term -type f -exec stat -f "%Sm" -t "%Y-%m-%d" {} + | sort -r | head -n 1
	else
		find $term -type f -exec stat --format="%y" {} + | sort -r | head -n 1 | cut -d' ' -f1
	fi
}

Here we take in the line from the recent function outlined in the preceding section, and return the date of the most recently updated file, relative to the passed in line. Lets look in more detail

  • [[ -f $1 ]] && term=$(dirname "$1") || term=$1/..

    If the passed in line is a file, we set the variable term to the directory of the file. Otherwise, we set term to the parent directory of the passed in line. So if the passed in line is reponame/README.md it will search for the most recently updated file in reponame, and if the passed inline is reponame/styles, where styles is a directory, it will search in reponame/styles/.., which is reponame. This ensure consistency, ie in both cases it searches the directory conraing what could be either a file or a subdirectory, not within the subdirectory itself.

    The rest of the function finds the stat of each file in the directory, sorts them in reverse order, and returns the first result. We’re returning just the date here as we don’t need the file or directory name. THe find syntax being slightly different for Mac and Linux, we check the uname first before running the approprate find command

_format_dir_path

_format_dir_path () {
	echo $1 | awk '{sub(/\/[^\/]*$/, ""); print}' | awk -F'\\./' '{if ($2 == "") print "."; else print $2}'
}

This admittedly dense oneliner, strips the ./ from the beginning of the passed in path, and removes the final slash and everyhing after it. In the case of the file being in the current directory, eg ./Makefile, there is nothing to display, so it substitutes a .. This last function only exists for tidier return values, ie reponame and not ./reponame/styles

ColorCyan

ColorCyan () {
  echo -ne '\e[36m'$1'\e[0m'
}
```

A small helper function used by `recent` to color code output

## Extending the function

We can now extend the function to find commonly searched for directories. Lets say we commonly search for the most recently updated astro applications. We can make an `astros` function that calls the `recent`

#### `astros`
```bash
astros () {
  [[ -n $1 ]] && recent $1 astro.config.mjs || recent 10 astro.config.mjs
}
```

## Usage

```bash
 astros 4
Finding 4 most recent directories containing astro.config.mjs
---
2023-05-28 venlo/template/astro
2023-05-28 dev.io37.ch
2023-05-07 seacroft
2023-04-15 created-by-venlo/bus-station

22 total
```
3
28 May 2023

Upsearching directory tree

Sometimes I want to be able to find a particular file in a directory tree. I wrote a shell function called upsearch that is used to search for a file or directory from the current working directory upwards to root (”/”) in the directory tree. This function can be handy in scenarios where you are trying to find a file or directory that exists at some level up in your directory structure, but you’re not sure exactly where.

upsearch () {
  slashes=${PWD//[^\/]/}
  directory="$PWD"
  for ((n=${#slashes}; n>0; --n )) do
    test -e "$directory/$1" && echo "$directory" && return
    directory="$directory/.."
  done
}

Here’s how the function works:

  • slashes=${PWD //[^\/]/}

    This line is counting the number of slash (/) characters in the current working directory path ($PWD) by removing all non-slash characters. The result is stored in the slashes variable. This is used to determine the maximum depth to search upwards in the directory tree.

  • directory="$PWD"

    This line sets the directory variable to the current working directory.

  • test -e “$directory/$1”`

    Inside the for loop, this checks if the file or directory specified as the argument to the upsearch function ($1) exists in the current directory.

    If the file or directory exists (test -e returns true), it prints the directory path and then exits the function (return).

    If the file or directory does not exist, the directory variable is updated to point one directory higher ($directory/..). This moves the search up one level in the directory structure.

    The loop repeats until it finds the file or directory, or it has searched up to the root directory.

Usage

 upsearch .git
 upsearch Makefile

This can now be used by other functions:

Examples

cdrepo

cdrepo () {
  cd $(upsearch .git)
}

If we’re located somewhere inside a git repo then we can quickly jump to the root of the repo

m

m () {
  mf=$(upsearch Makefile)
  if [[ ${#mf} -gt 0 ]]; then
    cd $mf
    make $1
  else
    echo No Makefile found. Nothing to do
  fi
}

Here we can run make from anywhere, and it will upsearch for the nearest Makefile and run it with the argument passed to the function. If no Makefile is found while traversing up the directory tree, it will print a message and do nothing.

Usage

 m help
2
6 May 2023

I don’t use symbolic links a whole bunch, but when I do use them I always forget the order of arguments in the ln command. So I wrote a function that allows you to create a symbolic link in any order so I never have to think about it again.

isym () { # Make symbolic link in any order # ➜ isym cats dogs
  [[ -e $1 ]] && ln -s $1 $2 || ln -s $2 $1
}

Here’s a breakdown of what happens within this function:

  • [[-e $1]]

    Initially, the function checks whether $1, the first parameter, is a valid file or directory (-e). This safety check prevents creating symbolic links to non-existent files or directories.

  • && ln -s $1 $2

    If $1 is indeed a file or directory, the function creates a symbolic link to $1 named $2.

  • || ln -s $2 $1

    If the first condition fails (i.e., $1 doesn’t exist), the function attempts to create a symbolic link to $2, named $1.

Usage

 isym <file> <link>
 isym <link> <file>
 isym /etc/asda.conf ~/asda.conf
 isym ~/asda.conf /etc/asda.conf

Now this can be used in any order without worrying about the order of the arguments.

1
6 May 2023

If your dokku push doesn’t trigger a build

Dokku is a great cost-effective way to host your Rails apps, and is well documented elsewhere. I followed the instructions at https://marketplace.digitalocean.com/apps/dokku to create my dokku droplet. But there are a couple of caveats. The first is you’ll need to increase swap size on your VM for dokku to work. I created a zsh/bash function to do that

Increase Swap Size

bump () {
	sudo install -o root -g root -m 0600 /dev/null /swapfile
	sudo dd if=/dev/zero of=/swapfile bs=1k count=2048k
	sudo mkswap /swapfile
	sudo swapon /swapfile
	echo "/swapfile       swap    swap    auto      0       0" | sudo tee -a /etc/fstab
	sudo sysctl -w vm.swappiness=10
	echo vm.swappiness = 10 | sudo tee -a /etc/sysctl.conf
}

Create Application

You also need to create your application before you can deploy it. There are a number of things to do here, so i also combined them into one function

newapp () {
	local email="cityguessr@skiff.com"
	local domain="ol14.cc"
	dokku apps:create $1
	dokku postgres:create $1db
	dokku postgres:link $1db $1
	dokku domains:set $1 $1.$domain
	dokku letsencrypt:set $1 email $email
	dokku letsencrypt:enable $1
	dokku letsencrypt:auto-renew
}

You’ll need to add the letsencrypt dokku plugin

dokku plugin:install letsencrypt

and you can add a remote

g remote add dokku dokku@ol14.cc:kiseljak

and it will push your app and build it

But will it? (Push doesn’t trigger a build)

I couldn’t get this to work consistently, and I couldn’t find much helpful on the web at all. But I was able to trigger a build from the dokku server itself with the following

dokku ps:rebuild kiseljak

So I knew the app was fine, but doing a git push wasn’t triggering a rebuild. The feedback from the git push isn’t that helpful as it reports a successful push but no build is triggered

The solution

The solution that worked best for me was to create a global post-receive hook that will trigger the build automatically

  dokku@ol14:~  cat ~/.config/git/hooks/post-receive
REPO_NAME=$(basename $(pwd))

if command -v dokku &> /dev/null
then
  DOKKU_ROOT="/home/dokku" dokku git-hook $REPO_NAME
fi

Your hooksPath may be different, you can check or set it in your gitconfig

  dokku@ol14:~  cat ~/.gitconfig | grep core -A2
[core]
        editor = vi
        hooksPath = ~/.config/git/hooks

If we return to the pre-recieve hook, this sets a git-hook of the repository name, which gets set on app creation (so will work for all newly created applications on the dokku server). On git push, the post-recieve hook is activated and the build process starts

Github Action

Naturally, you’ll want this to work on a github action rather than pushing directly to dokku. Here is an example of a working action

☁  brew@kelso:kiseljak cat .github/workflows/dokku.yml
name: "dokku"

env:
  url: kiseljak

on:
  push:
    branches:
      - main

jobs:
  deploy:
    runs-on: ubuntu-22.04
    steps:
      - name: Cloning repo
        uses: actions/checkout@v4
        with:
          fetch-depth: 0

      - name: Push to dokku
        uses: dokku/github-action@master
        with:
          branch: "main"
          git_remote_url: "ssh://dokku@64.23.226.251:22/~/kiseljak"
          ssh_private_key: ${{ secrets.SSH_PRIVATE_KEY }}

The git_remote_url line is the most important to get right here. I could not get this to work via domain, only via ip. I’m not sure if this is someting to do with ipv6 or not, but to get working via domain may need extra work. If you’re using dokku it means you’re using your own vps, so you will have a static ip to use here

Dockerfile caveat

One other thing whih sometimes seems to get in the way of dokku is the Dockerfile that Rails provides by default. In some applications this seemed to be a problem and in others it wasn’t. If you don’t nee the Dockerfile, just rename to Dockerfile.orig